Tuesday, June 24, 2014

Sous-Vide Duckstrami

Moulard Duckstrami

Yup, that's what I am making!! I've been criticized in the past for posting pictures of what we eat but that's not gonna stop me!! Most people don't know what their food looks like or where it comes from. So with my blogs I am hoping to share a little bit of insight and hopefully know how. I am not on a crusade or anything but I think we should respect the process. Oh by the way these Moulard Duck Breasts were free range and organically raised. 
If you love beef pastrami you will love Duck pastrami. I chose Moulard Duck Breasts to make my Pastrami. My reasoning for choosing this Species of Duck was the percentage of duck fat it carries. A Muscovy duck breast has about 18% fat, the Peking duck breast has about 29% and the Moulard is a cross between the Muscovy and the Pekin.  In a previous post I made Muscovy Duck Pastrami and it was the bomb. I wanted to try Moulard because they're bigger and have more fat.  These babies are huge too (2900 grams and 6.39 lbs).

 instructions


This recipe is almost identical to my other pastrami recipe with the exception to a tweak in salt and cloves quantities. 


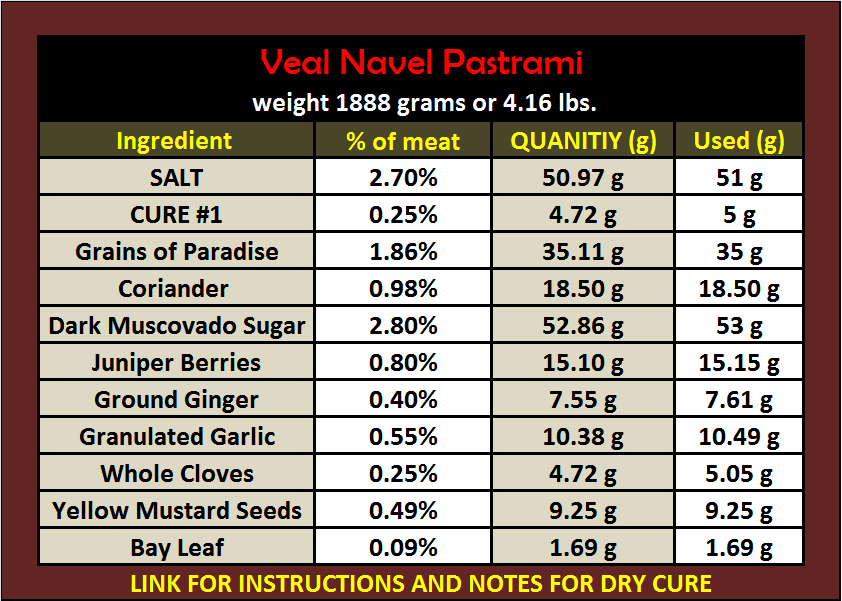
The first thing I did was measure out all the ingredients and put them in separate bowls. As you can see I used percentages based on meat weight. This makes replicating recipes very easy. Two of my ingredients make this Pastrami I think very unique. 

First I used Grains of Paradise instead of Black Pepper. Grains of Paradise has a peppery taste with hints of citrus.


I also used Dark Muscovado Sugar instead of Brown sugar. It's a molasses sugar that is very moist and gets its unique flavor from sugarcane juice. The other ingredients are pretty common. I decided to use a combination of spices that are common with both Beef and duck. Heck this is just an experiment. 

The first thing I did was combine the Salt and cure #1 together and coat both sides of the Duck Breast rubbing it into every nook and cranny. Next I combined the rest of the ingredients and thoroughly coated both sides of Duck Breast.

I Vacuumed sealed the breast and plan on flipping it every day until fully cured. I think I will give them about 12-14 days to cure. These breast are very thick.
I used equilibrium curing instead of excess salt curing. Excess salt curing is a technique where you cover the meat entirely in salt. 

Equilibrium curing is using exact amounts needed for the cure. 
"This method would be the Sous-Vide cooking of the curing world"Jason Molinari


Procedures after the curing process. Remove breast from bag and rinse under cold water removing as much as the cure as you can. 
Pat dry and apply Rub .

 notes
mixed up and ready to go....


Place the Grains of Paradise, Coriander, Juniper Berries, and Cloves (if using whole) and grind in a spice grinder. Apply Rub to both sides of the Duck.


Place Duck breast in smoker. I cold smoked the breasts at the ambient temp outside using Apple pellets for about 2 1/2 hours.  I used a cold smoking device called A-MAZE-N-PELLET-SMOKER

After the cold smoking process I hot smoked the breast using charcoal and apple wood. Starting at a very low temp below 175 and bring it up to about 225 degrees. I will smoke the duck breasts until an internal temp of 135 degrees is reached. 

Note: the breasts internal temp ranged form 133-143 because of placement in smoker and size of breast.

Vacuumed Sealed

After they are done smoking I will Sous-Vide the breasts for 3 hours at 137 degrees to tenderize them. As you can tell from the picture they are beautiful and developed a great bark.


Floating in a thermal bath getting tenderized. 


Final thoughts- Textually different from the Muscovy Breasts and very meaty. Not as delicate as the Muscovy Breasts but still over the top as far as Duckstrami goes. I will be making this again. 


Now for the gratuitous photographs. 


TOP OF PAGE


Sunday, June 15, 2014

Smokey Turkey-Legs Sous-Vide

I have been wanting to Sous-Vide Turkey legs for the longest time but I have never been a fan because of those darn tendons. They are a pain to eat around. Then I had a thought..... why not Sous-Vide the legs and remove the tendons with culinary pliers. Of course I am not doing to stop there. After the Sous-Vide I am going to smoke that Legs for a couple of hours using my Weber smokey mountain using charcoal and chunks of Apple wood.   


The big question was how to remove those damn tendons. Do I do it before or after I cook them? Well after some exploratory knife cutting I decided to do it after they were cooked. Those tendons are locked in there mighty tight. I tried to remove them with pliers but I would have torn up the meat really bad. 


The next question of course was "at what temperature do I cook the Legs at". I searched and searched the net and found many many different suggested temps out there. Some suggested cooking at 150 degrees for 8 hours and some as high as 176 degrees for the same time. I talked with a chef and he personally likes 149 but this seemed low to me. Anyhow I used 160 degrees for 6 hours. Although they came out great I think I should have used 149 for 8 hours like the chef suggested. Of course I was going to smoke them regardless of temp I was going to use.  

Here is a picture of the legs after they came out of the Sous-Vide. The legs look very unappealing if you ask me. 

A picture of the leg being filleted open to reveal tendons.


Very difficult to remove tendons. It was not pretty and I tore up the meat just a bit.   


The goal of the smoke was to impart flavor so I kept the temp down by adding ice cold water to the pan below. I was able to keep the temp within 10 degrees of 180 degrees. They smoked for 3 hours.


Over all they turned out really well. The family loved them but I think they could have been better. 

What did I learn from this experiment? Next time I will Sous-Vide at 149 like the Chef said for 8 hours. I am hoping that the additional 2 hours will allow easier removal of tendons.  And I will Brine the legs this time.  Since this dish was a spontaneous one I had no time. 

I will do this again in the next two weeks hopefully!!!!!


Saturday, June 14, 2014

Veal Naval Pastrami

Veal Naval Pastrami
Before writing this blog on yet another Pastrami I tried to answer a predictable yet old question about the Ethical Objections to Veal? If you're curious click the link. 

Belly, Navel or Plate it's all the same to me meaning it's all good.  So what is Pastrami? Pastrami is just cured meat

It's my goal to make as many pork charcuterie replicas as possible and the caveat of course is to use Biblical Kosher animals only. What makes this one so different? Ahhh...it's the meat I am using. I am using the delectable Veal Navel or belly (plate) as some call it. 

I was able to special order this Veal Belly at Stewart's Meats in Yelm WA. It cost $140.00 bucks for this delectable piece of heaven. If you add in the Gas and toll I am sure it's closer to $160.00 bucks for this hunk of meat but it's all worth it. I will be able to make a Veal-Cetta, Veal Pastrami and a Veal Stock from this belly. 


First time working with Veal plate. Very easy and pliable to work with.


Here is a picture of both sides of the Veal. It still has to be broken down. 

Some great pics of meat being broken down. 


Section of bones. 


Bones, bones and bones!!! Breaking everything down for a Veal Stock. 


Lots of scraps for my stock.


My scraps all sealed up for future use. 


This section will be used for my Veal Navel Pastrami.


This section will be used for the Veal-Cetta. 
 instructions and notes


This is an interesting recipe and one I have been working on for some time. In this version I decreased the salt from 3.56% to 2.7% and increased the cloves from .20% to .25%I am hoping these adjustments will be a grand slam.  I combined the salt and Cure#1 and rubbed it into the meat thoroughly getting into every nook and cranny.


I took the whole spices and herbs, (Bay leaf, Grains of Paradise, Coriander, Juniper berries, Whole cloves and mustard seeds) and placed them in a dry pan and applied a little heat to them to bring out their essential oil. I then grounded them up in a spice grinder. 

I combined the the ground up spices with the remaining ingredients and applied them to both sides of the meat thoroughly. 

All Vacuumed Sealed up and will be flipped every day for 14 days. After curing I will rinse the pastrami and apply rub. The Pastrami will be cold smoked for several hours, than SEMI-Hot smoked at 150 degrees. I will than Sous-Vide the Pastrami for 24 hours at a 149 degree water temp. Note: with the brisket I Sous-vide it for 48 hours. This is veal and is more tender. After the Sous-Vide I will refrigerate over night (optional) and apply a light rub and Hot smoke again to form a better bark. When I say hot smoke I am talking about 180 degrees or below. 


The Temp out side was about 65 degrees. I used Apple pellets and the A-MAXE-N-PELLET-SMOKER.   I filled the water reservoir up with a bucket of ice and water. I used old fashion charcoal and apple wood to smoke the meat and of course using my Smokey Mountain Cooker makes it easy. The temp fluctuated between 175-200 degrees. I cold smoked for 2 1/2 hours and hot smoked for 3 hours.


All cooked and ready for a 24 hour Sous-vide.


Sitting in the water bath. After the 24 hour water bath I will chill it down in a ice water immersion. It will sit in the refrigerator over night. I will than give it a light coating of Rub and hot smoke at a very temp to create a great bark. 

Ok, all done smoking. Ready for the steam bath.


Of course I am using a commercial steamer. It will be done when a knife can pierce through the meat easily. 


All done. A thing of beauty.
Final thoughts are on bottom of page. Perfection all the way!!


This is the fattier section of the plate Pastrami. Amazing!!!!


Final thoughts: One word AMAZING!! One of the most tasty pastrami's I have ever made. I will not change a thing. Every step was perfect!!! The texture, the taste was to die for. Flavors not too pronounced or muted by the long Sous-vide process. The salt content this time was perfect. As you recall I reduced it a bit.

To recap all the steps to pull this off:

  • Buy Veal Plate
  • Prepare Belly and get spices and herbs in order.
  • Vacuum Seal and cure
  • Rinse
  • Fold and shape into desired shape
  • 36 hour rest in cooler
  • Apply Spices and sugar and Cold Smoke for 2-3 hours
  • Semi-Hot-Smoke at about 150-170 degrees for a couple of hours
  • Sous-Vide at 149 degrees for 24 hours. 
  • Ice bath for 3 hours
  • Refrigerate at least 24 hours
  • Apply another thin
    layer of spices
  • Semi-Hot-Smoke to create a better bark. 
  • Steam until tender
  • Slice thin
  • Eat until content


Opinions- Now having made Pastrami over a dozen times using plate, duck, and brisket I have become somewhat of an aficionado on the subject. Having brined and dry cured many pastrami's I would have to say my preference is dry curing. It produces a better flavor transfer and you have better control over salt percentages.