

What is traditional Chili? There are many versions out there but when I say traditional I mean the one without beans. It's not that I don't like beans but in my opinion they don't belong in Chili. Certainly not my Chili.

For the past few months I have been playing around with Sous-Vide Faux Meat Aging and have gotten some great results. I decided to try this approach with Chili. If you want detailed info on Sous-Vide Faux Meat Aging click the link above but I will quickly sum it up for you. SV-Faux Meat Aging is all about enhancing the Umami flavors in the meat which means more beef flavor by using fish sauce and tenderizing the meat using low temps utilizing the Sous-Vide cooking approach.


I used Short Ribs and Chuck which are some of the best cuts for chili.

Here's a pretty picture of both the Rib and Chuck. The Top one is the Rib and the bottom is the Chuck.


Here's how you calculate 3%. The meat weighed 9.1 lbs which equals 4127.69 grams. 4127.69 grams X 3% (.03) = 123.83 grams. I know what you're thinking too....why so precise? By being precise I can replicate everything exactly all the time. I do this with anything requiring measuring.


NOTE: Meat was Shocked in ICE-WATER and refrigerated for a couple of days.The meat was dried off with paper towels and I used a little fan to aid in the drying. I sprayed the meat with a little canola oil and covered all the meat with Ancho powder but any chili powder would have worked nicely. Don't forget the meat is ice-cold!!!!!

 I cranked up the BBQ grill and browned them to develop more flavor. Since they were ice-cold I was not worried about over cooking the meat.
Simply gorgeous!!!!

Now on to the smoker. This will add to the complex flavors that I wanted to incorporate into my chili. Smoked at 200˚ƒ for 90 minutes using Apple.

After the meat came off the smoker I cooled it rapidly and partially froze it for the next step. Yup that's right I am going to grind it up.

This is first for me too. I hate ground meat in Chili because you cannot brown it up properly. My preference has always been Chunks and shredded. I decided to give this a try because I was able to properly prepare it before it went into the grinder. Grinding 9 lbs of meat took all about 60 seconds using the Lem #32 grinder. I couldn't shove it into the grinder fast enough. Note: meat went into the grinder partially frozen. Meat placed into refrigerator until I was ready for the next step.

 How many chilis and which ones? I always use as my standard 2-3 per pound of meat depending on their size. Each variety of chili brings something unique to the chili. I love all dried Chili's. Some Chili's have a unique flavor profile that I just adore and will work well in Chili.
Well with that in mind I chose a variety of peppers to bring out that special taste that I was looking for. One Chili I chose is Cascabel Chili. They have a tendency to loose their seeds and when shaken sound like a bell hence the name. From my experience the flavor denotes earthiness, smoke, complex flavors with a little heat.
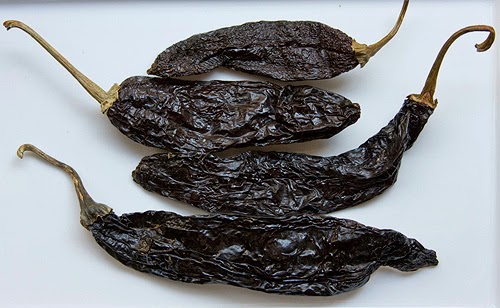

I also chose Passilla Chili, Ancho Chili's, Mulato Chili, Chili Negro, Habanero Chili and Chipotle Chili's too. Some are sweeter than others and others have a complex and sometimes chocolaty overtones. One of my favorite Peppers would have to be the Ancho. The Ancho is sweet and smokey. I just love this pepper. The Gaujillo Chili are the bomb for Chili's and stews and was added to my Chili too. And last but not least is the Hatch Chili. Suffice it to say I used a lot of Chili's.


I like to de-seed the chilies before I do anything. It helps later on after you roast them. Whether you seed them before or after you roast is not a huge deal. If the chilies are really dense I will de-seed them after I roast them. Roasting them brings out flavors and nuances that can't be obtained any other way.
Note: Re-Hydrate using beef stock!!!!

5-10 minutes at 300˚ƒ is all you need. You will smell them when they are done and they will puff up too. After they are seeded and roasted place them in a large vessel and submerge them for about an hour to re-hydrate them. They will be pliable and ready for the blender.


Using tongs place the chilis in the blender. Most of the seeds will be on the bottom of the vessel. You might need to add more chili water to the blender to get it going. You want the chili paste to resemble a thick milk shake.


Strain the chili water through a china cap or fine sieve and preserve liquid.

I love all kinds of fresh chilis and they add a complexity to the chili. I used a variety of chilies. Every color and every variety. Mix and match. I mostly used sweet ones and a few Poblanos and Anaheim.


Of course you gotta have lots of onions and garlic.

My favorite pan to use. It holds 20 quarts and is 20" X 5". The large surface area allows allows for superior caramelization and evaporation.


Toss everything in pan and sauté. Add lots of salt and pepper.

Here comes the garlic. Add garlic only after sautéing the other veggies for a while. You don't want the garlic to burn.


Deglaze with your favorite beer. Beer adds complexities to the chili. My favorite is Stout!!!!! There is no other!! I dislike IPA's. Let it cook down for a few minutes before adding the rest of the ingredients.


No Chili would be complete without Mexican Chocolate. I used two bars for about 12 Quarts of Chili.

Add the Chili Sauce, the Chili water and the Mexican Chocolate. This is where we start to go a little crazy. We start to build our Chili adding things to bring about what we think we want in a chili. It's different for everyone which is why chili making and what is considered good is subjective. Of course my chili is the best.

I added some tomato paste and a little crushed tomato to add to the depth of the chili. Many chilies start out with tomatoes as their first ingredient but I think that's crazy. Chili is made from Chilies not tomatoes.

I added Mexican Oregano (amazing srtuff) and Cumin. I also added some Black Cumin too.

I took a page out of the Serious Eats Chili recipe and added a little Star Anise, Coriander and Cloves. Well worth doing this!


Call me crazy but I love dehydrated lime zest and Lime Juice powder. You don't have to add much but dang is it good. The powder brings in a little acid and freshens up the dish. Adding a citrus note adds balance to the dish.

I added some of my dehydrated bell peppers too. Why because I add them on hand.
 Now you have to adjust everything. I added Honey and Muscovado sugar. I love this sugar and is superior to Brown Sugar. Keep tasting and adjust from here. Add more chili if you have too. keep adjusting until you get it right. I added some powdered roasted garlic because I thought it needed something extra and this added to the overall flavor. The last thing I added was cilantro and green onions. Keep tasting and remember to rinse your palate each time. If you find it needs more heat add some. I used Chipotle and Habaneros very sparingly because I knew as it cooked it would continue to get hotter. Overall I thought it was Mild-Medium but my kids thought it was Hot. My wife thought it was Medium Hot. I thought it was perfect of course.
Since we started out with tender meat the chili was fully cooked and I was able to serve it in 2 hours. Did I like the ground meat? I liked my ground meat. I love using chunks of meat but this (my version) was awesome.


I like to de-seed the chilies before I do anything. It helps later on after you roast them. Whether you seed them before or after you roast is not a huge deal. If the chilies are really dense I will de-seed them after I roast them. Roasting them brings out flavors and nuances that can't be obtained any other way.
Note: Re-Hydrate using beef stock!!!!

5-10 minutes at 300˚ƒ is all you need. You will smell them when they are done and they will puff up too. After they are seeded and roasted place them in a large vessel and submerge them for about an hour to re-hydrate them. They will be pliable and ready for the blender.


Using tongs place the chilis in the blender. Most of the seeds will be on the bottom of the vessel. You might need to add more chili water to the blender to get it going. You want the chili paste to resemble a thick milk shake.


I love all kinds of fresh chilis and they add a complexity to the chili. I used a variety of chilies. Every color and every variety. Mix and match. I mostly used sweet ones and a few Poblanos and Anaheim.


Of course you gotta have lots of onions and garlic.

My favorite pan to use. It holds 20 quarts and is 20" X 5". The large surface area allows allows for superior caramelization and evaporation.


Toss everything in pan and sauté. Add lots of salt and pepper.

Here comes the garlic. Add garlic only after sautéing the other veggies for a while. You don't want the garlic to burn.


Deglaze with your favorite beer. Beer adds complexities to the chili. My favorite is Stout!!!!! There is no other!! I dislike IPA's. Let it cook down for a few minutes before adding the rest of the ingredients.

Let's build the chili. Add the meat.

No Chili would be complete without Mexican Chocolate. I used two bars for about 12 Quarts of Chili.

Add the Chili Sauce, the Chili water and the Mexican Chocolate. This is where we start to go a little crazy. We start to build our Chili adding things to bring about what we think we want in a chili. It's different for everyone which is why chili making and what is considered good is subjective. Of course my chili is the best.

I added some tomato paste and a little crushed tomato to add to the depth of the chili. Many chilies start out with tomatoes as their first ingredient but I think that's crazy. Chili is made from Chilies not tomatoes.

I added Mexican Oregano (amazing srtuff) and Cumin. I also added some Black Cumin too.

I took a page out of the Serious Eats Chili recipe and added a little Star Anise, Coriander and Cloves. Well worth doing this!


Call me crazy but I love dehydrated lime zest and Lime Juice powder. You don't have to add much but dang is it good. The powder brings in a little acid and freshens up the dish. Adding a citrus note adds balance to the dish.

I added some of my dehydrated bell peppers too. Why because I add them on hand.

Since we started out with tender meat the chili was fully cooked and I was able to serve it in 2 hours. Did I like the ground meat? I liked my ground meat. I love using chunks of meat but this (my version) was awesome.